Introduction
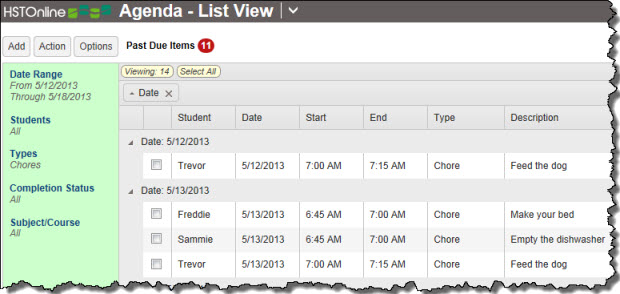
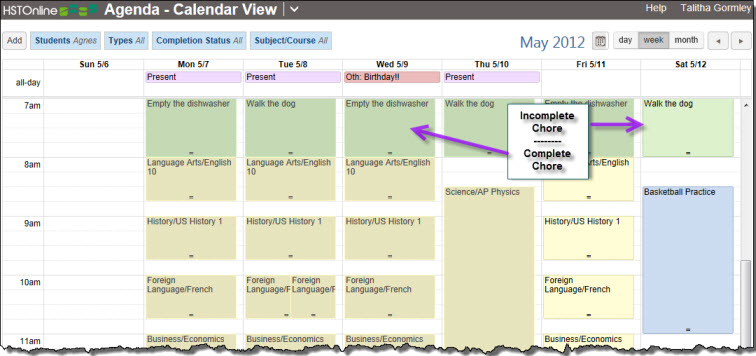
Use the optional Chores feature to keep give your student a well-rounded day including school work and family responsibilities. Chores can be any task you desire and can be assigned to your students to appear along with their schoolwork in the Agenda and be included in the Daily Task List of work to be done by your student.
This Help Page deals with assigning Chores to Students. Please see the Chores Help Page for information on creating the actual Chores and their directions.
Adding Chores
You can add a single Chore entry for one or more Students or create multiple Chore entries for one or more Students using the Add Chore form.
- Skip to Students and Details section
- Skip to Day and Date section
- On the HSTOnline menu, click or touch 'Agenda - List View' under the 'Schedules and Planning' section.
- On the Agenda - Calendar View or Agenda - List View page, click or touch the Add button and select 'Chore'
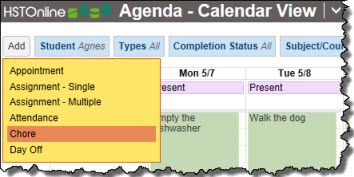
Agenda - Calendar View: Add - Attendance 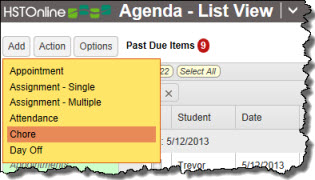
Agenda - List View: Add - Attendance 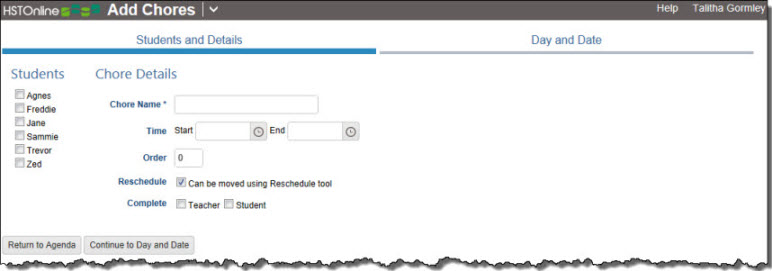
Add Chore - first visit - The Add Chore form is a tabbed area. Click on a tab name to move to that area. You can move back and forth as many times as you need as you adjust your option settings.
- In the left tab, you will select the Students who will receive the Chore(s) and set the Chore Name, Time or Block, Order and Reschedule options for the Chore(s).
- In the right tab, you will set the Day and Date parameters for the Appointment(s) you are creating.
- Students and Details: The form starts with this tab activated, which is indicated by the dark blue line under the Students and Details heading.
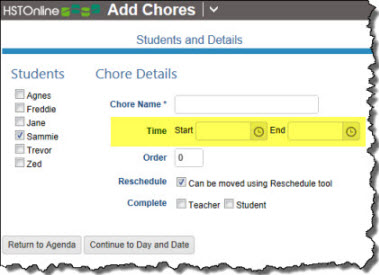
Students and Details Section - using Start/End Times 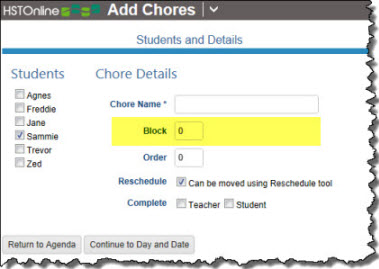
Students and Details Section - using Blocks - Students: Choose the Students who will receive this Chore.
- The first time you enter this area, no students will be selected. On subsequent visits, HSTOnline will show your previous Student selections. Exception: If you have just one active Student in your Student list, that Student will be automatically selected.
- Click or touch the check box for each Student you want to include for this Chore.
- Chore Details:
- Chore Name: Enter one of your Chore Names for this item. The Chore Name field is a Smart Entry Field so you can:
- press the space bar to get a list of all your active Chore Names, scroll to the one you want, and click or touch the entry to accept that selection.
- enter one or more letters into the Chore Name field to see a list of Chore Names that start with those letters
- enter the name of a new Chore Name into the field. The new Chore will be added to your Chore Names list. You can go there to add any instructions needed for the new entry.
- Once you have selected a Chore Name, any instructions that have been entered for the Chore will appear below the Complete field in a yellow box.
- Time Start/End or Block: The field that appears (Time or Block) depends on your settings in Program Options. Set the Start/End times or Block for the Chore, or leave these fields blank.
- Order: This field appears only if enabled in Program Options. Enter the Order value for this Chore or leave it blank.
- Reschedule: Check the box if you want this Chore to be able to be moved to a different date using the Reschedule feature; leave the box empty if you do not want this Chore to be able to be moved using Reschedule. The box is checked by default.
- Complete: If desired, you may mark the Chore you are creating as Complete. If you check the Teacher or Student Complete boxes here, they will be checked for all Chores created as part of this process.
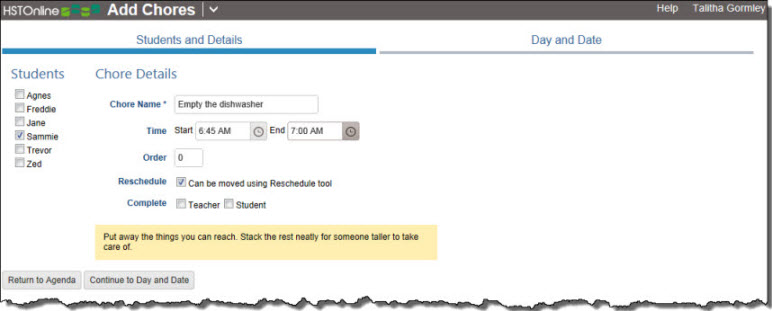
Chore Example - Students and Details - Chore Name: Enter one of your Chore Names for this item. The Chore Name field is a Smart Entry Field so you can:
- Click or touch:
- Return to Agenda to cancel this process and return to the Agenda - List view
- Continue to Day and Date to move to the next set of options. You can also click or touch the Day and Date tab to move to that are of options.
- Day and Date Options: When you choose 'Continue to Day and Date' or click or touch the Day and Date Options tab, the Day and Date Options tab will display a dark blue line, indicating
it is the active area.
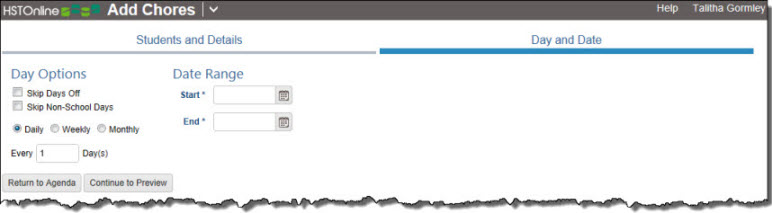
Day and Date Options Section - Day Options: Set the parameters for the Chore(s) to be created.
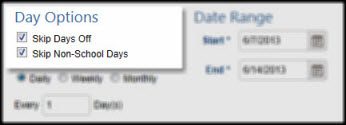
- Check the boxes to Skip Days off and/or Skip Non-School Days.
Skip Days Options 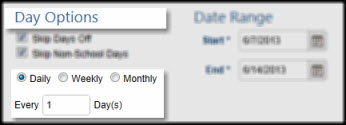
Daily, Weekly, Monthly Options - Both boxes are checked by default. HSTOnline will remember your settings when you return to this area.
- Skip Days off will cause HSTOnline to skip over any days that have already been noted as a Day Off within your school year.
- Non-School Days are those days of the week that are unchecked in your School Profile.
- Click or touch the radio button for Daily, Weekly or Monthly. See the
Day Options Help Page for step-by-step instructions on completing this section. Below is a brief description of each option:
- Daily: HSTOnline will gather a list of all dates that fall within your selected date range, remove the dates that violate your 'Skip' settings, and then place a Chore on each date int he date range according to your 'Every_Day' entry.
- Weekly: HSTOnline will gather a list of all dates that fall within your selected date range, cull the
list to only those dates which match the days of the week you have selected for your Weekly options, and then remove from the remaining dates any that violate your
'Skip' settings. Finally, HSTOnline will place a Chore on each remaining date in the range according to your
'Every _ Weeks' entry. - Monthly: HSTOnline will gather a list of all dates that fall within your selected date range, cull the list to only those dates which match the date of the month or # day of the month you have selected (First Tuesday, Third Monday, etc.) and then remove from the remaining dates any that violate your 'Skip' settings. Finally, HSTOnline will place a Chore on each remaining date in the date range.
- Check the boxes to Skip Days off and/or Skip Non-School Days.
- Date Range: Set the range of dates needed.
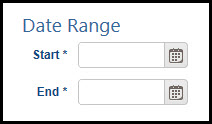
Date Range - To create a single Chore, set the Start Date and End Date fields to the same date.
- Start Date: Enter a date in the mm/dd/yyyy format or use the Calendar icon to select a date.
- End Date: You may choose any date you wish that is greater than or equal to the Start date. Enter a date in the mm/dd/yyyy format or use the Calendar icon to select a date.
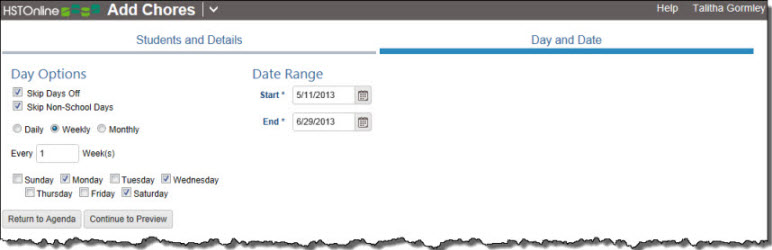
Chore Example - Day and Date - Click or touch:
- Return to Agenda to cancel this process and return to the Agenda - List view.
- Continue to Preview to see a preview of items that will be added to your Agenda.
- If you choose 'Continue to Preview', HSTOnline will show you the Chores that will be created based on your option settings. Use this opportunity to review the items before accepting
them to be added to your database.
- The Preview will show you all items, sorted by date and then by Student. You can group or sort the Preview list in any way you like and HSTOnline will remember those settings each time you return to the Preview list.
- If the results are not what you expected, you can click or touch the Students and Details tab or the Day and Date tab to reset your options and then click or touch the Return to Preview button to see the new results.
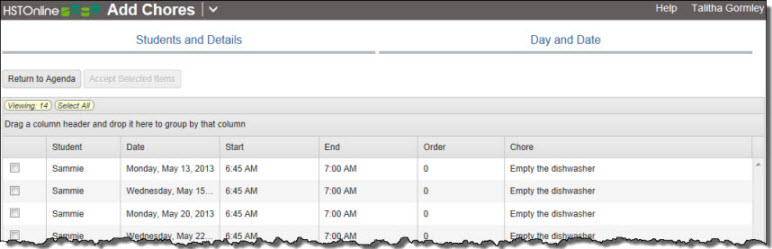
Preview - Once you are satisfied with the items displayed in the Preview, you can select the items you want to add to your Agenda. Click or touch the 'Select All' badge to select all the Chores in the list.
Alternatively,
- you can click or touch the checkbox for each Chore you want to accept.
- you can use your mouse to click and drag over contiguous entries in the list to select those items.
- on a touch device, you can touch and drag your finger over contiguous entries in the list to select those items.
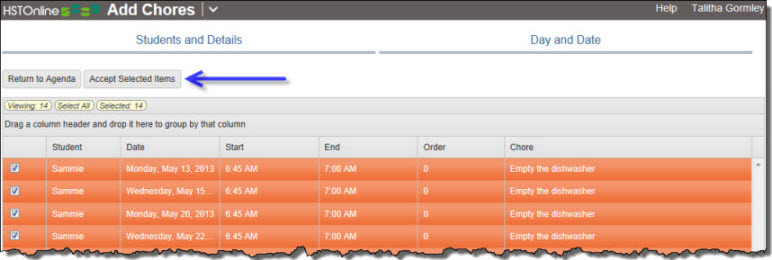
Select Items - Click or touch:
- Return to Agenda to abandon this process and return to the Agenda - List View.
- 'Accept Selected Items' to add the highlighted Chores to your Agenda.
Copying Chores
- Copy Over Date Range: Select any single assigned Chore to use it as a starting point to create Chore entries for one or more Students over a range of dates, following the Daily, Weekly or Monthly pattern you set.
- Duplicate: Select any one or more assigned Chores and duplicate them for another Student or Students.
Copying a Chore over a Date Range
You can select any single Chore and use it as the basis for creating new Chores for one or more Students over a range of dates, following the Daily, Weekly or Monthly pattern you set. The Copy over Date Range process uses the same form as the Add Chore form outlined above and fills in the Chore Name, Time/Block, Order, Reschedule and Complete fields from the original item. You can change these fields as needed. If you copy a Chore that has been marked as Teacher or Student Complete, the copies created will also have those fields marked as complete.
| Please Note: |
|---|
|
- On the HSTOnline menu, click or touch 'Agenda - List View' under the 'Schedules and Planning' section.
- Set the Date Range, Students and Types filters to display the item you want to use as the basis for the Copy over Date Range function.
- Click or touch the Chore you want to Copy.
- Click or touch the Action button and choose 'Copy over Date Range' to open the Copy Chore form.
- In the Students and Details tab:
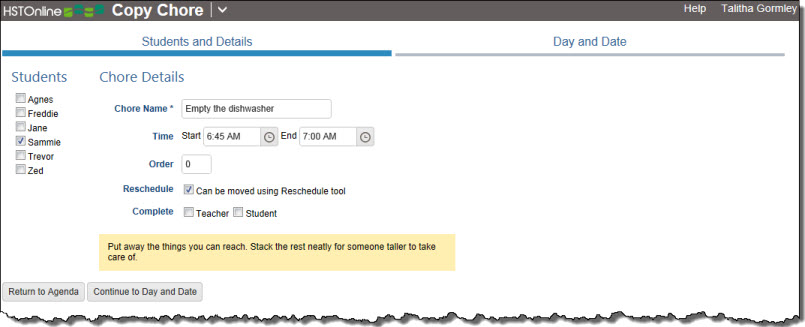
Copy Chore - Students and Details - Select the Students who will be receiving the new items. The Student attached to the original Chore will already be selected. Choose any other Students you want to create new Chores for.
- Set the Chore Name, Time/Block, Order, Reschedule status and Complete fields.. These fields will show the details of the original Chore. Change the settings as needed.
- Click or touch the Day and Date tab or the Continue to Day and Date button to access those options.
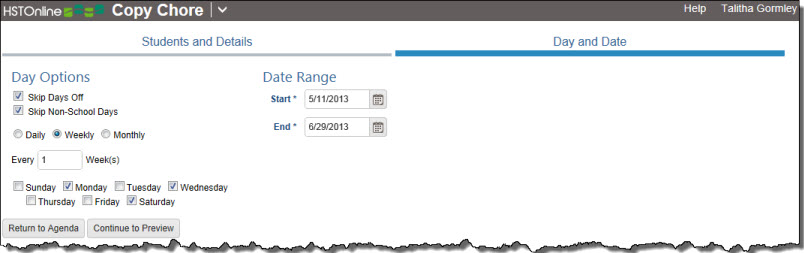
Copy Chore- Days and Dates - Under Day Options choose which types of days to skip and set the Daily, Weekly or Monthly pattern you want HSTOnline to follow when creating these items.
- Set the Date Range you want to use by entering a date in the Start and End fields using the mm/dd/yyyy format or click on the Calendar icon to select a date for each field.
- Click or touch Continue to Preview to review the Chores that will be created.
- If the results are not what you expected, you can click or touch the Students and Details tab or the Day and Date tab to reset your options and then click or touch 'Return to Preview' to see the new results.
- Once you are satisfied with the items displayed in the Preview, you can select the items you want to add to your Agenda. Click or touch the 'Select All' badge to select all the Chores in the
list. Alternatively,
- you can click or the checkbox for each Chore you want to accept.
- you can use your mouse to click and drag over contiguous entries in the list to select those items.
- on a touch device, you can touch and drag your finger over contiguous entries in the list to select those items.
- Click or touch:
- Return to Agenda to abandon this process and return to the Agenda - List View.
- 'Accept Selected Items' to add the highlighted Chores to your Agenda.
Duplicating Chores
Use this feature when you have Chores created that you need to duplicate with the same Date, Chore Name, Time/Block, Order, Reschedule and Complete status for another Student or Students.
| Please Note: |
|---|
|
- On the HSTOnline menu, click or touch 'Agenda - List View' under the 'Schedules and Planning' section.
- Set the Date Range, Students and Types filters to display the Chores you want to duplicate.
- Select one or more Chores that you want to duplicate.
- Click the checkbox for each entry you want to duplicate.
- You can use your mouse to click and drag over contiguous Chores to select those items.
- On a touch device, you can touch and drag your finger over contiguous Chores to select those items.
- Click or touch the 'Select All' badge to select all the items in the list. Note: You can duplicate Appointments, Assignments, Chores and Day Off entries at the same time. Just include all the items you want to duplicate in your selection.
- Click or touch the Action button and choose 'Duplicate' to open the Duplicate window.
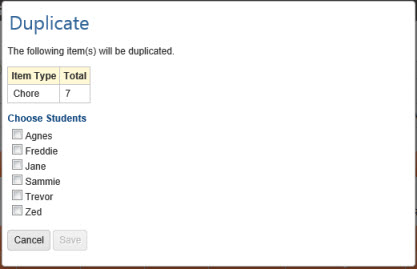
Duplicate Chores Window (Fig. 1) - HSTOnline will show you the number of Chores selected for duplication. (Fig. 1)
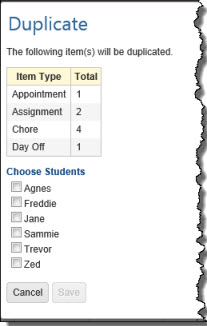
- If you your selection includes other types of items, those types and the number of each will be listed in the Duplicate window. (Fig. 2) If your selection includes Attendance items, they will be ignored as Attendance entries cannot be duplicated in this manner.
- Choose the Students to whom you want to copy the selected items. If you select the original Student, that Student will have the original items and the duplicates created.
- Click or touch:
- Cancel to abandon this process.
- Save to create the duplicates for the selected items and Students.
Editing Chores
You can edit any single Chore or any group of Chores to change any field for the selected item(s).
Editing a Single Chore
You can edit any single Chore to change any field selected item.
- On the HSTOnline menu, click or touch 'Agenda - Calendar View' or 'Agenda - List View' under the 'Schedules and Planning' section.
- On the Agenda - Calendar View:
- Set the filters to view the Chore you want to change.
- Click or touch on the item you want to change to open the tool tip window.
- Click or touch 'More' to open the Edit window for that item
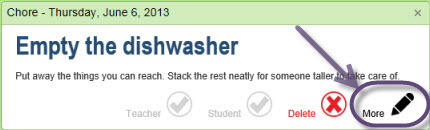
Agenda - Calendar View Tool Tip - More Button
- On the Agenda - List View:
- Set the Date Range, Students, and Types filters to display the Chore you want to edit.
- Double-click on the Chore you want to change to open the Edit Chore window.
- Alternatively, you can click once on the Chore you want to change and then click the Action button and choose Edit to open the Edit Chore window.
- On a touch device, touch the Chore you wish to edit and then touch the Action button and touch Edit to open the Edit Chore window.
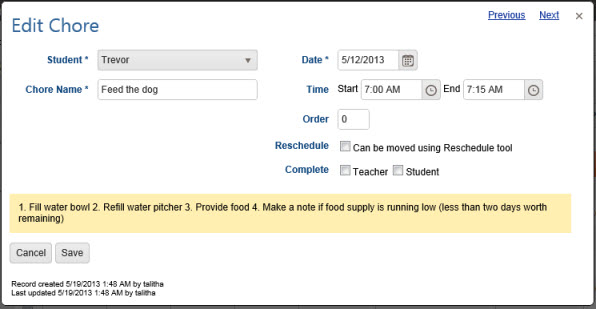
Edit Chore form
- On the Agenda - Calendar View:
- HSTOnline will show you when and by whom the original item was created and when and by whom it was last changed.
- Make any changes needed.
- Click or touch:
- Cancel to abandon this process.
- Save to keep your changes and update the Agenda.
- The Previous or Next hyperlink in the top right corner to save your changes to this Chore and move to the previous or next Chore in the list. You can click or touch Previous or Next until you have made all the changes you want to your Chores and then click the Save button to end the Edit process. If you reach the beginning or end of the list when clicking or touching Previous or Next, the Edit window will close and you will be returned to the list view. Note: When using Previous/Next, HSTOnline will move to the next or previous item of the same type - in this case, Chores - skipping over the other items in the Agenda - List View.
Editing Multiple Chores
You can edit any selected group of Chores to change any fields for the selected items.
| Please Note: |
|---|
|
- On the HSTOnline menu, click or touch 'Agenda - List View' under the 'Schedules and Planning' section.
- Set the Date Range, Students and Types filters to display the items you want to edit.
- Choose the Chores you want to multi-edit.
- Click the checkbox for each Chore you want to change.
- You can use your mouse to click and drag over contiguous Chores in the list to select those items.
- On a touch device, you can touch and drag your finger over contiguous Chores in the list to select those items.
- Click or touch the Action button and click or touch Multi-Edit to open the Multi-Edit Chores window.
- If your selection includes Chores and other item types (Appointments, Assignments, Attendance, and/or Day Off) the Multi-Edit option will be disabled. Reselect items to include only Chores.
- HSTOnline will show you how many items have been selected for editing.
- The fields in the Multi-Edit window will show the settings for the first Chore in your selection.
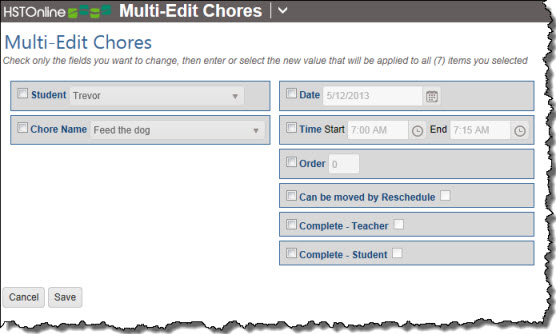
Multi-Edit Chores form - To enable the form, click or touch the box to the left of each field you want to change for all selected Chores. Make your selection for each of those fields.
- Click or touch:
- Cancel to abandon this process.
- Save to keep your changes and update the Agenda.
Marking Chores as Completed
You can mark any single Chore as Completed using the Edit feature. However, you can use the Mark as Complete to mark one or more Chores as Complete without having to open the items to do so.
When the Complete by Student field is enabled, Student users can utilize this feature to mark their Chores as Student Complete. Those logged in under an Administrator or Teacher account can use this feature to mark the selected items as Teacher Complete.
Marking as Complete in the Agenda - Calendar View
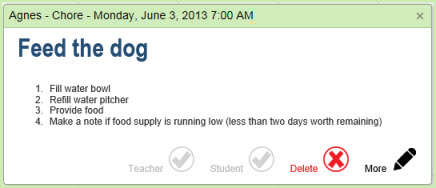
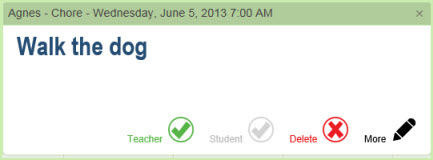
Use this feature to mark any one Chore as completed while in the Agenda - Calendar View.
- On the HSTOnline menu, click or touch 'Agenda - Calendar View' under the 'Schedules and Planning' section.
- Set the Student, Types, and Completion Status filters to display the item you want to work with.
- Click or touch the Chore you want to mark as completed to open the Tool Tip window for that item. (Fig. 1)
- Click or touch 'Teacher' or 'Student' in the tool tip window to mark the item as completed. (Fig. 2)
- Click or touch:
- the X in to the top right corner to close the tool tip window
- another Assignment or Chore in the Agenda - Calendar View to open the Tool Tip window for that item
Marking as Complete in the Agenda - List View
Use this feature to mark any one or more Chores as Complete at the same time. You can use the 'Mark as Complete' feature to mark Assignments and Chores as completed at the same time. Your selection can include items that are neither Assignments nor Chores. HSTOnline will simply ignore those items that are not eligible to be marked as completed.
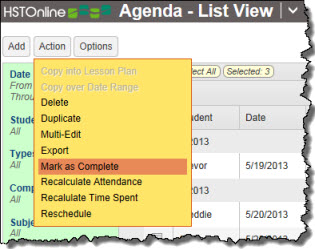
- On the HSTOnline menu, click or touch 'Agenda - List View' under the 'Schedules and Planning' section.
- Set the Date Range, Students, Types and Completion Status filters to display the items you want to work with.
- Choose the Chores you want to mark as completed.
- Click the checkbox for each Chore you want to mark.
- You can use your mouse to click and drag over contiguous Chores in the list to select those items.
- On a touch device, you can touch and drag your finger over contiguous Chores in the list to select those items.
- Click or touch the Action button and choose 'Mark as Complete'.
- All the selected Chores will be marked as completed.
- If logged in under a Teacher account, the Teacher Complete box will be checked and a T displayed in the Complete column.
- If logged in under a Student account, the Student Complete box will be checked and an S displayed in the Complete column.
Deleting Chores
Deleting Chores from the Agenda - Calendar View
You can delete any single Chore from the Agenda - Calendar view. To delete multiple items at the same time, use the Delete action in the Agenda - List View.
- On the HSTOnline menu, click or touch 'Agenda - Calendar View' in the 'Schedules and Planning' box.
- Set the filters to view the item you want to remove.
- Click or touch on the item you want to remove to open the tool tip window.
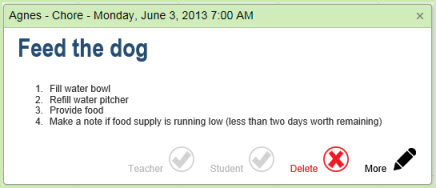
Agenda - Calendar View Tool Tip - Click or touch 'Delete' to open the Confirm Delete window for that item. The Delete option will only appear when signed in under an Administrator or Teacher account.
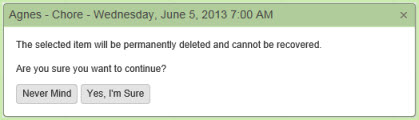
Confirm Delete - Click or touch 'Never Mind' to keep the item; click or touch 'Yes, I'm Sure' to remove the Day Off entry from your database. Deleted items cannot be retrieved.
Deleting Chores from the Agenda - List View
You can select any one or more Chores to completely remove them from your database.
- On the HSTOnline menu, click or touch 'Agenda - List View' under the 'Schedules and Planning' section.
- Set the Date Range, Students and Types filters to display the items you want to remove.
- Choose the Chores you want to delete.
- Click the checkbox for each Chore you want to remove.
- You can use your mouse to click and drag over contiguous Chores in the list to select those items.
- On a touch device, you can touch and drag your finger over contiguous Chores in the list to select those items.
- Click or touch the 'Select All' badge to select all the items in the list. Note: You can delete Appointments, Assignments, Attendance entries, Chores and Day Off entries at the same time. Just include all the items you want to delete in your selection.
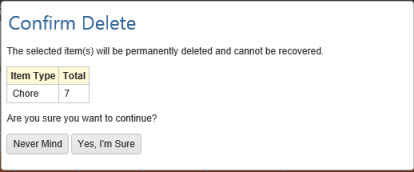
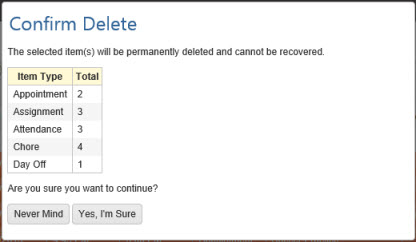
- Click or touch the Action button and choose 'Delete' to open the Confirm Delete window.
- HSTOnline will show you the number of Chores selected for deletion. (Fig. 1)
- If you your selection includes other types of items, those types and the number of each will be listed in the Confirm Delete window. (Fig. 2)
- Click or touch:
- 'Never Mind' to cancel the delete process.
- 'Yes, I'm Sure' to complete the deletion process. HSTOnline will delete all of the selected items from the database. Deleted items cannot be retrieved.
Printing Chores
You can create a printed list of Chores for any date range using the Daily Task List report. The report can include any combination of Appointments, Assignments and/or Chores.
You can export a list of Chores for any date range to a .CSV file using the Export option under the More button in the Agenda - List View. The file can include any combination of Appointments, Assignments and/or Chores.