Customizing Your HSTOnline Experience
As the Administrator for your HSTOnline account, you can set a number of options to personalize HSTOnline to your needs. You can change your settings at any time. Some options will enable or disable various features of the program, as outlined below. The Program Options menu can only be accessed when signed in under the Administrator User Account. The settings you choose here will be applied to all users of your account.
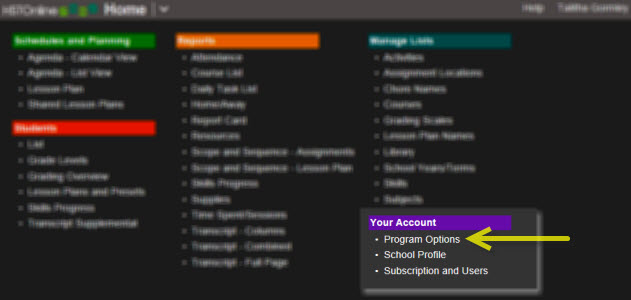
To access Program Options, click or touch Program Options under the 'Your Account' section of the HSTOnline menu.
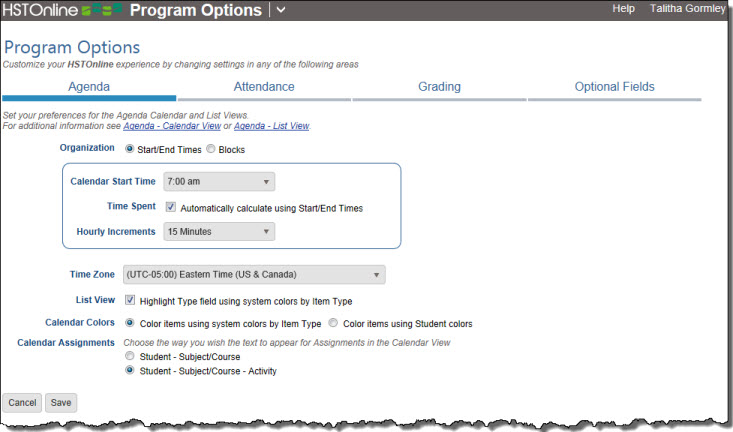
The Program Options page is a tabbed area. The active area will be denoted by a dark blue line under the title. Click or touch the tab for the area you want to work with: Agenda, Attendance, Grading or Optional Fields. You can move back and forth between the tabbed areas in any order you like. Be sure to click the Save button before leaving the Program Options pages to keep the changes you have made.
Agenda Options
Use these options to customize the Agenda - Calendar View. There are two main options: Start/End Times and Block. While you do not have to enter anything into the Start/End Time or Block fields, you must make a selection between the two for your database. Start/End Times is selected by default.
Start/End Times
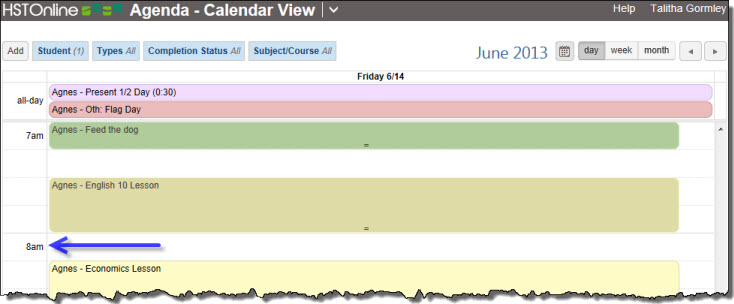
When using this option, the Agenda - Calendar View will display times in the left column. For every Appointment, Assignment and Chore created, you can choose to set starting and ending times or you can leave these fields blank. Items with no specified starting and ending times will appear in the 'all day' section of the Agenda - Calendar View.
Blocks
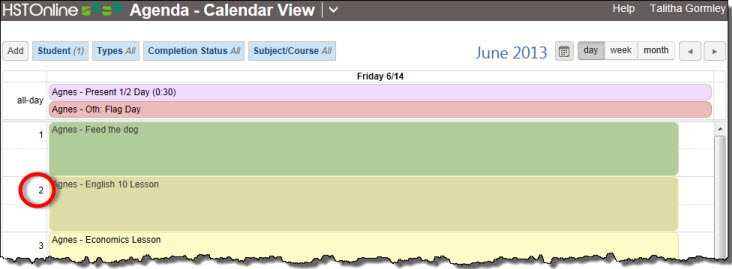
When using this option, the Agenda - Calendar View will display numbers in the left column, each number representing a Block. This option provides a method for ordering your day without being tied to specific time slots. For every Appointment, Assignment and Chore created, you can choose to assign a Block (from 1 to 20) to order your items throughout the day, or you can leave this field blank. Items with no specified Block will appear in the 'all day' section of the Agenda - Calendar View.
For more infomration, please see Why Use Blocks instead of Time?.
Setting Agenda Options
- On the HSTOnline menu, click or touch Program Options under the 'Your Account' section.
- On the Program Options page, click or touch the Agenda - Calendar View tab.
- Organization: Choose whether you want to use Start/End Times or Blocks to set the order of items in your Agenda - Calendar View.
- Start/End Times:
- You may add specific start and end times for Appointments, Assignments and Chores, or leave those fields blank. When the Start/End Time fields are blank, the item will appear in the Agenda - Calendar View in the All Day section at the top of the date column.
- Calendar Start Time: Choose the time when your school day generally starts. This will set the first time that is highlighted in the Start Time field
drop down.
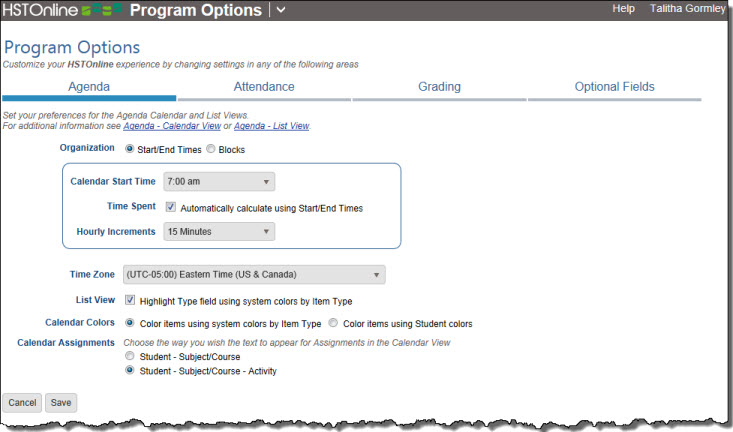
Agenda Start/End Times Options - Time Spent: Check the box to have HSTOnline automatically enter a Time Spent value based on the
Start and End times entered for each Assignment.
- For example, if an Assignment is created with a start time of 8:30 am and an end time of 10:00 am, enabling this feature would cause HSTOnline to enter 1:30 in the Time Spent field.
- This option is only available if you selected Start/End Times above and the Time Spent field is enabled in Optional Fields.
- You can edit the automated entry at any time. HSTOnline will only overwrite your changes if you alter the start or end time for that assignment, or if you use the Recalculate Time Spent tool.
- Hourly Increments: Choose to have your Agenda hours display in 15, 20, 30 or 60 minute increments. The default setting is 15 minutes and provides the
best option visually in the Calendar View.
- Choosing 15 minute increments divides each hour into 4 segments of 15 minutes each.
- Choosing 20 minute increments divides each hour into 3 segments of 20 minutes each.
- Choosing 30 minute increments divides each hour into 2 segments of 30 minutes each.
- Choosing 60 minute increments divides each hour into 1 segment of 60 minutes.
- The increment you choose will determine the default time options listed in the Start/End time entry fields.
- You can manually enter any time you need, regardless of the pre-set increments.
- Blocks:
- A Block field will replace the Start Time and End Time fields in all Add/Edit windows. Appointments, Assignments and Chores will appear in the Agenda - Calendar View based on the
number entered in the Block field. When the Block field blank, the item will appear in the Agenda - Calendar View in the All Day section at the top of the date column.
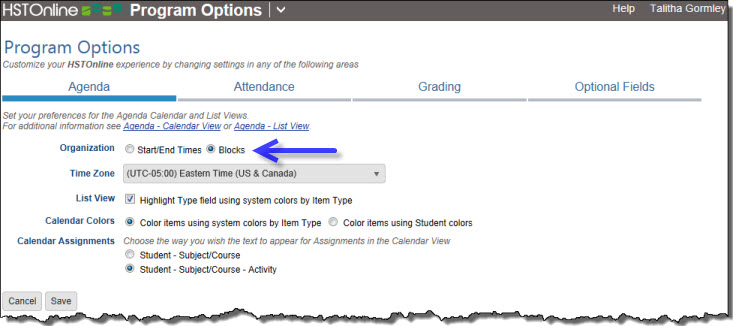
Agenda Block Options
- A Block field will replace the Start Time and End Time fields in all Add/Edit windows. Appointments, Assignments and Chores will appear in the Agenda - Calendar View based on the
number entered in the Block field. When the Block field blank, the item will appear in the Agenda - Calendar View in the All Day section at the top of the date column.
- Time Zone: Choose your local time zone from the list provided. Your selected Time Zone will dictate the date/time posted in the footer of your reports. In addition, the Time Zone setting will determine when to change over the selected date from 'today' to 'tomorrow'.
- List View: Click or touch the checkbox to choose to use the background colors of each type from Agenda - Calendar View as the background for the Type field in
the Agenda - List View to help you differentiate more easily between them.
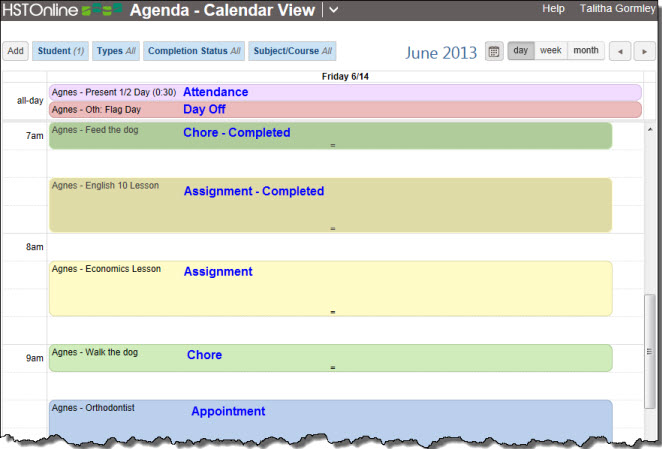
Background colors on entries in Agenda - Calendar View (Fig. 1)
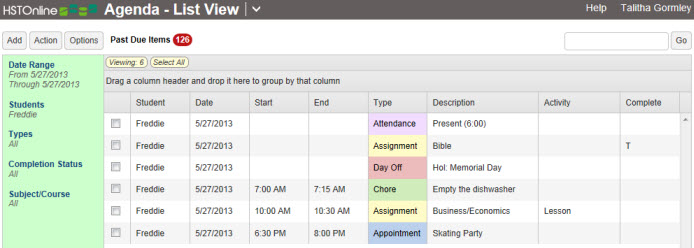
Background colors on TYPE cell in Agenda - List View - Calendar Colors: Choose to use the designated item type colors in the Agenda - Calendar view (Fig. 1, above), or to see all item types colored by the Student they
belong to. If you only have one student, you will probably use the colors by Item Type. If you are viewing two or more Students, you might prefer to show everything according
to the selected background color for the Student. You are setting the options for what the Teacher and Administrator logins will see in
the Agenda - Calendar view, whether looking at entries for one or multiple Students. When a Student is logged in, they will always see their items according to the designated Item Type
Colors as noted in Fig 1, above.
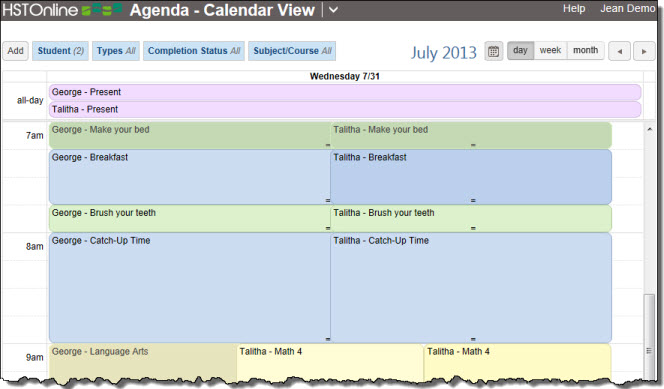
Multiple Students - Item Type Colors
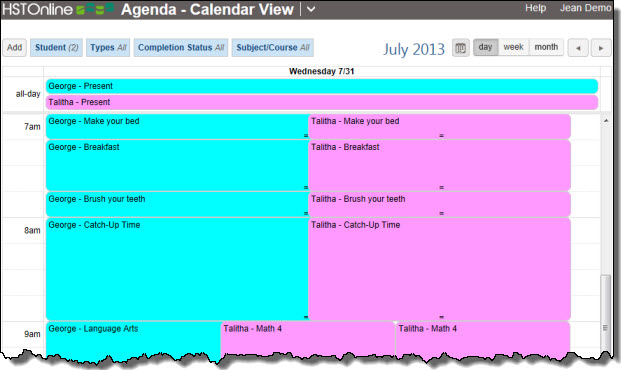
Multiple Students - Student Background Colors - Calendar Assignemnts: Choose what you want to see displayed in the Agenda - Calendar View Assignment entry.
- Student - Subject/Course: This is the default selection and shows Student name, followed by the Subject or Course. If there is a Course tied to the
Assignemnt, only the Course name will appear. If there is no Course tied to the Assignment, the Subject name will appear.
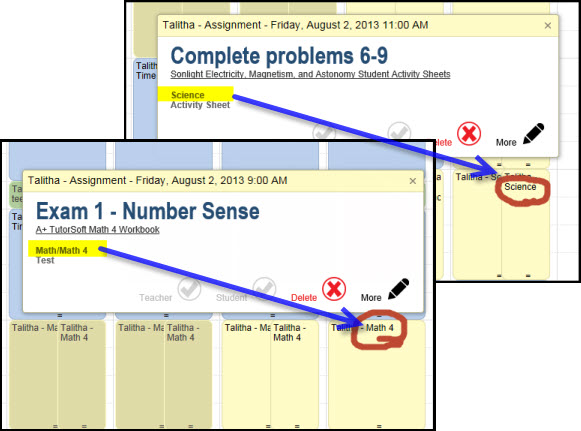
Subject or Course depending on Assignment settings. - Student - Subject/Course - Activity: In this option, the Activity tied to the Assignment will be displayed ater the Student and Subject or Student and
Course information. Displaying the Activity can help you quickly differentiate between similar items in the Agenda - Calendar View.
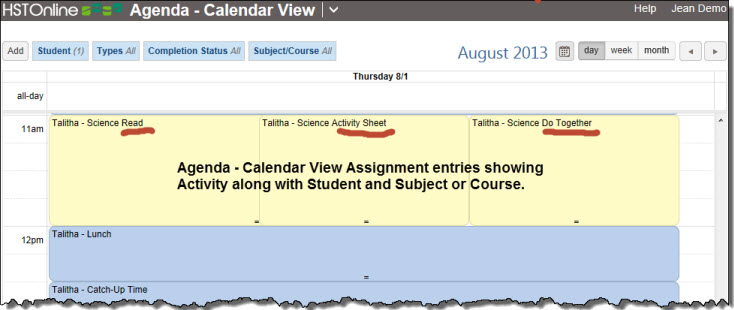
Displaying Activity along with Name and Subject or Course 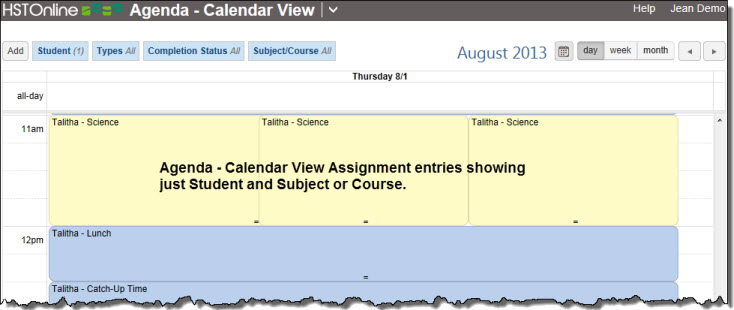
Not Displaying Activity
- Student - Subject/Course: This is the default selection and shows Student name, followed by the Subject or Course. If there is a Course tied to the
Assignemnt, only the Course name will appear. If there is no Course tied to the Assignment, the Subject name will appear.
- Start/End Times:
- Click or touch:
- Cancel to abandon your changes.
- Save to set your options.
- Click or touch 'Ok' on the 'Changes Saved' window.
- If you have changed from Start/End times to Block or vice versa, data already entered is retained in the database and will be displayed if you switch back to the opposite option.
Attendance Options
Use these options to customize how Attendance is marked in the Agenda, and how your daily school hours are logged. These options allow you to enable Auto-Attendance to have HSTOnline create Attendance entries for any date which has at least one completed Assignment. Attendance can be marked manually at any time whether using Auto-Attendance or not. See the Attendance Help Pages for more information about adding, editing and deleting Attendance records.
Auto-Attendance will follow your settings below to mark a date as 'Present' or 'Present 1/2 Day' when there is at least one Assignment on the date with a check in the Teacher box of the Complete field.
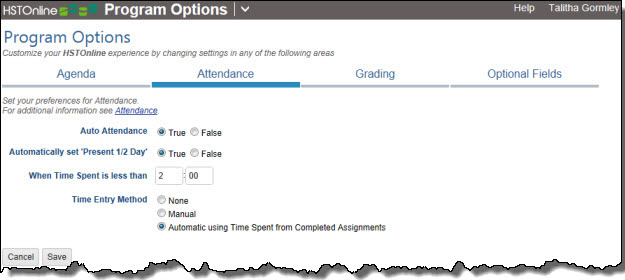
- On the HSTOnline menu, click or touch Program Options under the 'Your Account' section.
- On the Program Options page, click or touch the Attendance tab to open the Attendance options window.
- Auto-Attendance: Choose whether or not to use the auto-attendance feature.
- When Auto-Attendance is True, a 'Present' entry is added to the Student's Agenda on any date with at least one Assignment marked Teacher-Complete (one where there is a check in the Teacher box of the Complete field).
- When Auto-Attendance is set to False, you may still choose to manually enter Attendance at any time.
- See the Attendance Help Pages for more information about adding, editing and deleting Attendance records.
- Automatically Set 'Present 1/2 Day": This option only appears when Auto-Attendance is set to True and either Time Spent or Sessions is enabled in the
Optional Fields section.
- Enabling this option allows you to have days marked as 'Present 1/2 Day' when the Time Spent or Sessions entered for all completed Assignments on a date fall below a pre-set minimum.
- Enter a minimum value for Time Spent or Sessions - whichever field you are tracking.
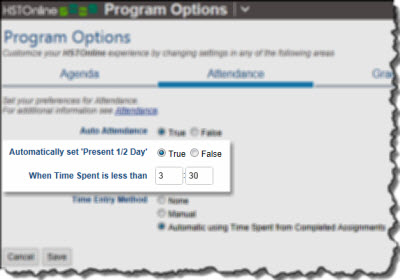
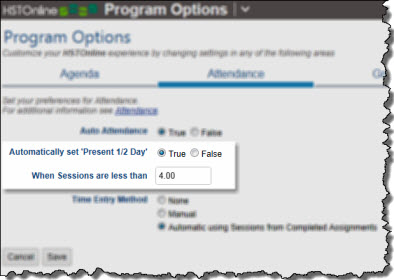
Present 1/2 Day - Time Spent Limit Present 1/2 Day - Sessions Limit - Time Entry Method: In addition to marking a date as 'Present' or 'Present 1/2' you can log the number of hours or sessions spent in school on that date. Choose one of the options
below:
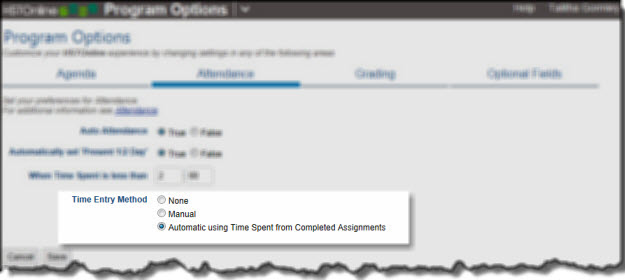
Time Entry Method Options - None: No hours information will be displayed with Attendance entries.
- Manual: You can manually add any amount of time in HH:MM format to any 'Present' or 'Present 1/2' Attendance entry. Edit any Attendance entry to enter the amount of time to be recorded for that date.
- Automatic Using Time Spent from Completed Assignments: The Time Spent field must be enabled in Optional Fields for this choice to appear. When selected, HSTOnline will display the total Time Spent for all Assignments marked Teacher-Complete for any date that is marked 'Present' or 'Present 1/2 Day'.
- Automatic Using Sessions from Completed Assignments: The Sessions field must be enabled in Optional Fields for this choice to appear. When selected, HSTOnline will display the total Sessions for all Assignments marked Teacher-Complete for any date that is marked 'Present' or 'Present 1/2 Day'.
- Click or touch:
- Cancel to abandon your changes.
- Save to set your options.
- Click or touch 'Ok' on the 'Changes Saved' window.
Grading Options
Use these options to enable or disable grading, or to set the Calculation method and rounding used for grading. See the Grades, Grading Scales, and/or Weighted Grading Help Pages for more information.
- On the HSTOnline menu, click or touch Program Options under the 'Your Account' section.
- On the Program Options page, click or touch the Grading tab to open the Grading Options window.
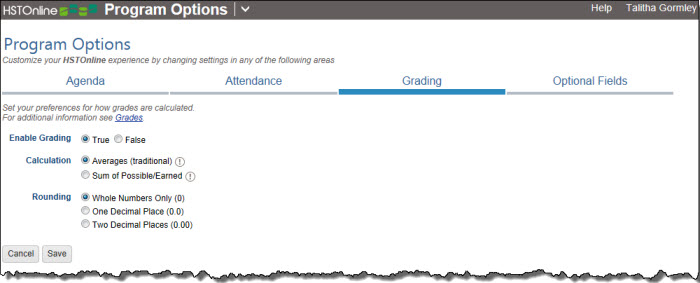
- Enable Grading: Turn grading on or off. When Grading is set to True, other options will appear; when Grading is set to False, there are no additional options to set here.
- With Grading set to True:
- You can grade whichever assignments you like: all of them, some of them, none of them.
- With Grading set to False:
- No additional options will appear on this page.
- You cannot grade any assignments.
- The Points Possible, Points Earned and Grade fields and columns are hidden.
- The Grading Scales list is disabled.
- The Grading Overview page is disabled.
- The Report Card and Transcript reports are disabled.
- With Grading set to True:
- Calculation: Choose how your student's grades will be calculated.
- Averages (Traditional):
- Each assignment for a Subject/Course is given a percentage grade, then those percentages are averaged together within a Term to generate a Term grade. Term grades are then rounded to match your options settings (whole number, 1- or 2-decimal places) and those rounded values are averaged to generate a Yearly grade. See Grade Calculation Method - Averages.
- Sum of Possible/Earned:
- A Term grade is generated by dividing the total points earned for all completed assignments in a Subject/Course by the total points possible for those assignments, essentially treating all of the individual Assignments as one single Assignment for the Term. Term grades are then rounded to match your options settings (whole number, 1- or 2-decimal places) and those rounded values are averaged to generate a Yearly grade. See Grade Calculation Method - Sum of Earned/Possible.
- Averages (Traditional):
- Rounding: Choose to have your grades displayed and rounded to a whole number, to the tenths place, or to the hundredths place.
- HSTOnline always calculates the percentage grade to the hundredths place for greatest accuracy, but will round the percentage grade for Report Cards and Transcripts based on the option you select here.
- Letter grades are awarded based on the rounded value you have selected.
- Click or touch:
- Cancel to abandon your changes.
- Save to set your options.
- Click or touch 'Ok' on the 'Changes Saved' window.
Optional Fields
Click on any box to remove the checkmark, disabling that field. Disabling a field can also disable features and reports linked to that data, as noted below. On startup, the following fields are disabled:
|
|
|
- On the HSTOnline menu, click or touch Program Options under the 'Your Account' section.
- On the Program Options page, click or touch the Optional Fields tab.
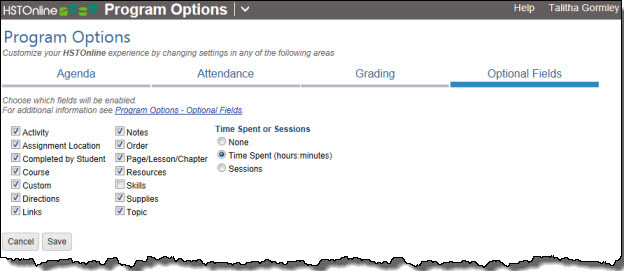
- Click or touch the checkbox next to each field to add (enabled) or remove (disabled) a checkmark. The information below tells you which features of HSTOnline are disabled if you disable that field.
- Activity:
- Hides the Activities option in the HSTOnline menu
- Hides the Activity field in Assignment and Lesson Plan Add/Edit windows
- Hides the Activity column in the Agenda - List View and Lesson Plan grids
- Disables the Weighted Grading option in Courses
- Assignment Location:
- Hides the Assignment Location option in the HSTOnline menu
- Hides the Assignment Location field in Assignment and Lesson Plan Add/Edit windows
- Hides the Assignment Location column in the Agenda - List View and Lesson Plan grids
- Disables the Home/Away Report.
- Completed by Student:
- Hides the Student checkbox in the Completed field in the Assignment Add/Edit window
- Removes the option of having the Student mark Assignments as completed
- Removes the Past Due notification when a Student is logged in.
- Course:
- Hides the Course option in the HSTOnline menu
- Disables the Weighted Grading option
- Disables the use of all but the Default Grading Scale
- Disables Credit Hours and GPA/Credit Summary options on the Transcript
- Disables the Courses Report.
- Custom:
- Hides the Custom field in Assignment and Lesson Plan Add/Edit windows
- Hides the Custom column in the Agenda - List View and Lesson Plan grids
- Directions:
- Hides the Directions field in Assignment and Lesson Plan Add/Edit windows
- Hides the Directions column in the Agenda - List View and Lesson Plan grids
- Links:
- Hides the Links field in Assignment and Lesson Plan Add/Edit windows
- Hides the Links column in the Agenda - List View and Lesson Plan grids
- Notes:
- Hides the Notes field in Assignment and Lesson Plan Add/Edit windows
- Hides the Notes column in the Agenda - List View and Lesson Plan grids
- Order:
- Hides the Order field in Assignment and Lesson Plan Add/Edit windows
- Hides the Order column in the Agenda - List View and Lesson Plan grids
- Page/Lesson/Chapter:
- Hides the Page/Lesson/Chapter field in Assignment and Lesson Plan Add/Edit windows
- Hides the PLC field in the Agenda - List View and Lesson Plan grids
- Disables the auto-increment option in the Copy feature
- Resources:
- Hides the Resource field in Assignment and Lesson Plan Add/Edit windows
- Hides the Resource column in the Agenda - List View and Lesson Plan lists
- Disables the Resources Report.
- Skills:
- Hides the Skills option in the HSTOnline menu
- Hides the Skills field in Assignment and Lesson Plan Add/Edit windows
- Hides the Skills column in the Agenda - List View and Lesson Plan grids
- Disables the Skills Progress feature in the Student area
- Disables the Skills Progress Report.
- Supplies:
- Hides the Supplies field in Assignment and Lesson Plan Add/Edit windows
- Hides the Supplies column in the Agenda - List View and Lesson Plan grids
- Disables the Supplies Report.
- Topic:
- Hides the Topic field in Assignment and Lesson Plan Add/Edit windows
- Hides the Topic column in the Agenda - List View and Lesson Plan grids
- Disables the Scope & Sequence - Assignment Report.
- Disabled the Scope & Sequence - Lesson Plan Report.
- Time Spent or Sessions:
- Choose to utilize the Time Spent field, the Sessions field, or neither of these fields (None).
- The Time Spent field is selected by default.
- Disabling Time Spent:
- Hides the Time Spent field in Assignment and Lesson Plan Add/Edit windows
- Hides the Time Spent column in the Agenda - List View and Lesson Plan grids
- Disables the Time Spent option in Attendance
- Disables the Time Spent option in Credit Hour Calculation
- Disabling Sessions:
- Hides the Sessions field in Assignment and Lesson Plan Add/Edit windows
- Hides the Sessions column in the Agenda - List View and Lesson Plan grids
- Disables the Sessions option in Attendance
- Disables the Sessions option in Credit Hour Calculation
- Disabling both fields:
- Disables all but the Basic option in Credit Hour Calculation for Courses.
- Disables all but the None or Manual Time entry in Attendance options.
- Disables the Home/Away Report.
- Disables the Time Spent/Sessions Report.
- Click or touch:
- Cancel to abandon your changes.
- Save to set your options.
- Click or touch 'Ok' on the 'Changes Saved' window.